Manifest
Each application must have an AndroidManifest.xml file (named exactly like this) in the root directory. The manifest file provides important information about the application to the Android system, information that the system must have in order to run each application code. Among other things, the manifest does the following:
1. Name the Java package for the application. The package name functions as a unique identifier for the application.
2. Describe the various components of application-activities, services, broadcast receivers, and content providers that make up the application. Name the class that implements each component and publishes its capabilities (for example, which Intent messages it can handle). This declaration tells the Android system about its components and in what conditions can be launched.
3. Determine the process that will host application components.
4. Declares which application permissions you must have to access the protected part of the API and interact with other applications.
5. Also declare other permissions that must be had to interact with application components.
6. Include a list of Instrumentation classes that provide profiles and other information when the application is running. This declaration only exists in the manifest when the application is created and tested; The declaration is deleted before the application is published.
7. Declares the minimum Android API level required by the application.
8. List the bibliography which the application must link to.
Structure
The diagram below shows the general structure of the manifest file and each element that can be contained. Each element, along with its attributes, is fully documented in a separate file. To see detailed information about each element, click the name of the element in the diagram, in the alphabetical list of elements that follow the diagrams, or the mention of other element names.
Element
Only the <manifest> and <application> elements are required, each must be present and may only occur once. Generally other elements can occur many times or absolutely not occur even though some of the elements must be present for the manifest to achieve something meaningful.
If an element contains nothing, it means that the element contains other elements. All values are set via attributes, not as character data in elements.
Elements of the same level are generally not sorted. For example, the <activity>, <provider>, and <service> elements can be mixed in any order. (The <activity-alias> element is an exception for this rule. This element must follow the alias <activity>.)
Attribute
Formally, all attributes are optional. However, there are parts that must be determined so that the element can achieve its objectives. Use documentation as a guide. For attributes that are truly optional, this either mentions the default value or states what happens if there is no specification.
In addition to some <manifest> root element attributes, all attribute names begin with the Android prefix: for example, Android: alwaysRetainTaskState. Because this prefix is universal, documentation generally removes it when referring to attributes by name.
Declaration
Many elements are related to Java objects, including the application element itself (<application> element) and its main component activities (<activity>), service (<service>), broadcast receiver (<receiver>), and content provider (<provider> ).
If defining subclasses, as you always define for component classes (Activity, Service, BroadcastReceiver, and ContentProvider), subclasses are declared via the name attribute. The name must include the full package destination. For example, the Service subclass might be declared as follows:
However, as shorthand, if the first character of the string is a dot, the string will be added to the application package name (as specified in the <manifest> element via the package attribute). The following designations are the same as above:
When starting a component, Android will create a subclass named named. If no subclass is specified, a base class instance will be created.
Multiple View
If more than one value can be set, this element is almost always repeated, not displaying a list of many values in one element. For example, the intent filter can include several actions:
Resource
Resource values use the following format:
String
When the attribute value is a string, two left slashes ('\\') must be used to leave the character, for example '\\ n' for new lines or '\\ uxxxx' for Unicode characters.
Friday, February 14, 2020
Wednesday, February 12, 2020
Widgeting (Android Studio)
There are various kinds of widgets provided by Android. Some of them are as follows:
TextView
TextView is used to display text to the user and can be optionally edited. TextView is basically a text editor, but by default it can't be edited. Following are some of the important attributes of TextView that are frequently used.
id (the unique ID used for reference in use).Widgeting
editable (If set to true, it will function as input).
fontFamily (for family font settings used).
text (the text that will be displayed).
textSize (Size of text in units of sp)
textStyle (Style (bold, italic, bolditalic). Can be used one or more by separating with the sign "|"
normal - 0
bold - 1
Italic - 2
The full attributes of the TextView widget can be seen on the https://developer.Android.com/reference/Android/widget/TextView.html page.
Edit Text
EditText is an overlay of a TextView whose default settings are set so that it can be a little. This is a subclass defined from TextView that includes rich text editing.
Button
Button is a push-button that can be clicked by the user to perform certain actions. Each Button has a default style of operating system used by the device.
Spinner
Spinner allows you to select items from the drop down menu. For example, when you use the Gmail application, you will get a drop down menu as shown below.
Read: https://knowledgefrans.blogspot.com/2020/02/manifest-android-studio.html?m=1
TextView
TextView is used to display text to the user and can be optionally edited. TextView is basically a text editor, but by default it can't be edited. Following are some of the important attributes of TextView that are frequently used.
id (the unique ID used for reference in use).Widgeting
editable (If set to true, it will function as input).
fontFamily (for family font settings used).
text (the text that will be displayed).
textSize (Size of text in units of sp)
textStyle (Style (bold, italic, bolditalic). Can be used one or more by separating with the sign "|"
normal - 0
bold - 1
Italic - 2
The full attributes of the TextView widget can be seen on the https://developer.Android.com/reference/Android/widget/TextView.html page.
Edit Text
EditText is an overlay of a TextView whose default settings are set so that it can be a little. This is a subclass defined from TextView that includes rich text editing.
 |
| Style from EditText |
Button
Button is a push-button that can be clicked by the user to perform certain actions. Each Button has a default style of operating system used by the device.
 |
| Example of an Android Button |
Spinner
Spinner allows you to select items from the drop down menu. For example, when you use the Gmail application, you will get a drop down menu as shown below.
 |
| Examples of Spinners in the Option Menu |
Read: https://knowledgefrans.blogspot.com/2020/02/manifest-android-studio.html?m=1
My Bio
Hidupku adalah milik Tuhan dan aku hidup hanya untuk Tuhan.
Akun Sosmed:
Facebook: (https://m.facebook.com/nia.ester.1?ref=bookmarks)
Instagram: @nathaniafrancesca0https://instagram.com/nathaniafrancesca0?utm_medium=copy_link
👉 YOUTUBE 👈
Tiktok: https://vt.tiktok.com/ZSePMX77o/
💼 Daftar Pekerjaan:
HOTEL HARGA TERJANGKAU:
1. Install Aplikasi Smart In Pays di Play Store/App Store . https://play.google.com/store/apps/details?id=com.droid.sip
2. Masukkan kode referal: Francesca2212
🏆 Prestasi/Penghargaan:
》Kompetisi Debat Mahasiswa, 2017
》English Debaters, 2016
》General English Course, 2013
》Seminar Nasional, 2017
》Workshop and Research, Academic Writing and International Publication, 2016
》ICTESS, China, 2016
》International Conference from Indonesia, Canada, Australia, Japan, Thailand, 2016. (MC)
》Lifelong Learning Education in Thailand, 2016 (MC)
》Development in Northeast Regional,Thailand, 2016 (MC)
》Workshop and Research, Academic Writing and International Publication, German, 2016 (MC)
》Sosialisasi Pelaksanaan Diplomasi Multilateral dalam Membangun Sinergi antara Kepentingan Nasional dengan Agenda Global, 2016
》Universitas Slamet Riyadi Language Center, 2018
》Seminar Nasional Anti Narkoba, 2016
》Rudy Hadisuwarno Education Institution
》Seminar Pemimpin Transformasi Membangun Kota Solo, 2015
》Latihan Keterampilan Manajemen Mahasiswa Tingkat Pra Dasar, 2015
》Makrabmaru FISIP UNISRI, 2015
》Duta Kampus UNISRI, 2016
》Putri SPARTA, 2012
》Juara 1 best dresscode Ella Organic Skin Care, 2014
》Juara 1 best dresscode Ella Organic Skin Care, 2014
》Queen of Youth Laskar Kristus, 2015
》Juara 2 Lomba Cerdas Cermat Alkitab
》Juara 2 Lomba mewarna tahun 2000
》Juara 1 lomba mewarna tahun 2003
》Juara 2 lomba mewarna tingkat Kecamatan tahun 2005
》10 Besar lomba mewarna logo tingkat Propinsi Jawa Tengah, 2005
👩🎓Pendidikan
👩🎓Pendidikan
https://instagram.com/aboutme426?utm_medium=copy_link
》SD Kristen Manahan (2001-2003)
》SD Pantekosta (2004)
》SD Kristen Widya Wacana X Kartasura (2005-2006)
》SMP Kristen Widya Wacana 1 Surakarta (2007-2010)
》SMK N 4 Surakarta (2010-2013)
》Universitas Slamet Riyadi S1 jurusan Ilmu Hubungan Internasional
》SD Kristen Manahan (2001-2003)
》SD Pantekosta (2004)
》SD Kristen Widya Wacana X Kartasura (2005-2006)
》SMP Kristen Widya Wacana 1 Surakarta (2007-2010)
》SMK N 4 Surakarta (2010-2013)
》Universitas Slamet Riyadi S1 jurusan Ilmu Hubungan Internasional
 |
| Wisuda S1 Ilmu Hubungan Internasional |
 |
| Wisudawan Terbaik Program Studi Ilmu Hubungan Internasional dengan Predikat Cumlaude Periode II Tahun 2019 |
HIMAHI (Himpunan Mahasiswa Ilmu Hubungan Internasional) periode 2016/2017.
Jabatan: Ketua Divisi Penelitian dan Pengembangan
Kerja Praktek/Magang:
》Reza Salon
》Pemerintahan Balai Kota Surakarta( bagian kerjasama)
Pengalaman Kerja:
》Lie Kuang Salon (Hair Stylist)
》iLufa 168 (Admin Retur)
》Ella Organic Skin Care, 2014 (Beautician)
》Happy House Salon
》Semar Private (Tutor)
》Rifan Financindo Berjangka, (Business Consultant), 28 Oktober 2019-27 November 2019.
》Hotel Asia (Receptionist)
Pengalaman Bisnis:
》Networker, sejak 17 Mei 2019
》Digital Platform Entrepreneur
》Travel Agent and Digital Payment, sejak 17 Mei 2019
》Make-up Artist (MUA)
》Salon Kecantikan (sejak 5 Desember 2020)
》Trader Gold (sejak 20 Juni 2020)
》English Tutor (sejak tahun 2015)
》Trader Gold (sejak 20 Juni 2020)
》English Tutor (sejak tahun 2015)
Project Structure (Android Studio)
As a start we discussed the Android Studio project structure. When we create an application project with Android Studio, we will get several packages, folders, and files that are in the project. To be able to see the structure of the project, we must first create a project with Android Studio. Please create a project and fill in the name of the project that we will create.
1. First open the Android Studio application. Select Start a new Android Studio project, after which the following picture will appear.
2. Fill in the name and press the Next button. Then it will be redirected to the next page as shown below.
3. Check the phone and tablet (this is because we build applications used for mobile phones and tablets) and select the minimum SDK. Here I use the minimum SDK API 15 Android 4.0.3 (meaning the application features that we make support Android v4.0.3 and above). Then press the Next button.
4. At this stage you will be asked to choose a template that will be used in building the application. Since we are going to start from the basics, it is recommended to choose the Empty Activity template. Then press Next.
5. Fill in the name of the activity that we will use. The name is up to you. After that press Finish and wait a few moments.
6. Creating a project with Android Studio is complete.
7. Following is the picture along with an explanation of the Android Studio project structure that I have tried to make above.
The explanation of the structure is as follows:
Manifest (app / manifest / AndroidManifest.xml)
The first manifest folder contains the AndroidManifest.xml file. This file contains components from applications such as activity, services, user permissions, content providers, and others.
Java (app / packagename / MainActivity.java)
The second folder, java, contains command files with java extension. In it there is also a java activity class file that is in the application.
res
This folder contains drawables, layouts, mipmaps, and values. Drawable contains a collection of images that we will use in the application. Layout is a place where the application's layout design file is located. Mipmap contains icons that we will use in the application, and values are places to store files such as colors, color strings (text data declarations that we will use for application components), and styles (contain resources about themes such as toolbar names) .
Gradle
Is a build tool used to run Android Studio applications. The build.gradle file is used to identify the OS, SDK, and library versions that we will use in building applications.
Read: https://knowledgefrans.blogspot.com/2020/02/widgeting-android-studio.html?m=1
1. First open the Android Studio application. Select Start a new Android Studio project, after which the following picture will appear.
 |
| Select Start a new Android Studio Project |
2. Fill in the name and press the Next button. Then it will be redirected to the next page as shown below.
 |
| Fill in the name of the Application |
3. Check the phone and tablet (this is because we build applications used for mobile phones and tablets) and select the minimum SDK. Here I use the minimum SDK API 15 Android 4.0.3 (meaning the application features that we make support Android v4.0.3 and above). Then press the Next button.
 |
| Complete Application data |
4. At this stage you will be asked to choose a template that will be used in building the application. Since we are going to start from the basics, it is recommended to choose the Empty Activity template. Then press Next.
 |
| Choose a template |
5. Fill in the name of the activity that we will use. The name is up to you. After that press Finish and wait a few moments.
 |
| Fill in the name of the Activity |
6. Creating a project with Android Studio is complete.
 |
| Android Studio Project Structure |
7. Following is the picture along with an explanation of the Android Studio project structure that I have tried to make above.
 |
| Android Studio Project Structure |
The explanation of the structure is as follows:
Manifest (app / manifest / AndroidManifest.xml)
The first manifest folder contains the AndroidManifest.xml file. This file contains components from applications such as activity, services, user permissions, content providers, and others.
Java (app / packagename / MainActivity.java)
The second folder, java, contains command files with java extension. In it there is also a java activity class file that is in the application.
res
This folder contains drawables, layouts, mipmaps, and values. Drawable contains a collection of images that we will use in the application. Layout is a place where the application's layout design file is located. Mipmap contains icons that we will use in the application, and values are places to store files such as colors, color strings (text data declarations that we will use for application components), and styles (contain resources about themes such as toolbar names) .
Gradle
Is a build tool used to run Android Studio applications. The build.gradle file is used to identify the OS, SDK, and library versions that we will use in building applications.
Read: https://knowledgefrans.blogspot.com/2020/02/widgeting-android-studio.html?m=1
Tuesday, February 11, 2020
Emulator (Android Studio)
To try a program created in Android Studio, an Android emulator is required. Or you can also directly run using an Android smartphone. Keep in mind that running an Android program via an emulator requires more computer RAM than using a smartphone. We recommend that the computer has 8GB of RAM or more if you want to use an emulator.
There are several Android emulator software that can be used, for example, the Android Virtual Device (AVD) provided by the Android SDK or emulators provided by third parties such as Genymotion.Android Virtual Device
To use the Android Virtual Device, the steps are as follows:
1. Open AVD Manager via the Tools menu > Android > AVD Manager. Or by clicking on the AVD Manager icon on the toolbar.
 |
| AVD Manager button on Android Studio |
2. Click the Create Virtual Device button.
 |
| Create Virtual Device button |
3. Select the device category you want to use (TV, Wear, Phone, or Tablet). Then select the screen size for the AVD to be created.
 |
| Select the device category |
4. Select the system image for the AVD to be created. The system image determines the version and architecture of the Android image used.
 |
| Select the system image |
5. Name the AVD.
 |
| Give the name AVD |
Genymotion
Apart from AVD you can also use other emulators. One example is Genymotion. In addition to Genymotion there are still other emulators that can be tried. Following are the steps to install Genymotion.
1. Genymotion requires the VirtualBox application. Install VirtualBox first. Download the VirtualBox installer file according to the operating system used at https://www.virtualbox.org/wiki/Downloads.
2. Install VirtualBox on the computer.
3. Download the free version of Genymotion namely Genymotion Personal Edition at https://www.genymotion.com/fun-zone/.
4. Install Genymotion.
5. The next step is to download the Android image. Click the Add button, then select the Android version and Device model.
 |
| Add button in Genymotion |
 |
| Select the Android version and device model |
6. Name the virtual device that was made.
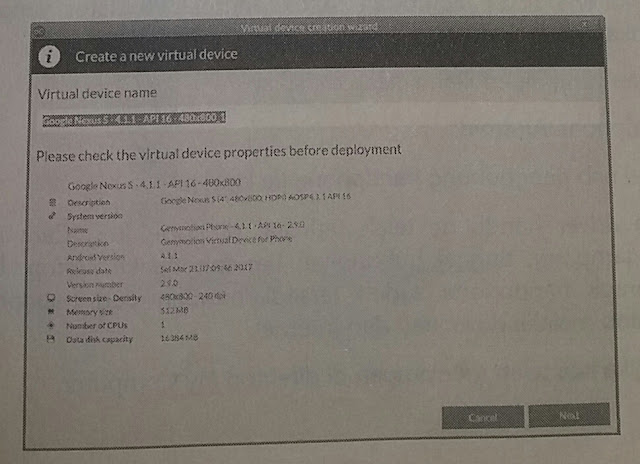 |
| Give the name of the virtual device |
7. To be able to use Genymotion, install the Genymotion plugin in Android Studio. The trick is to click the File menu> Settings> Plugins then type Genymotion and install.
 |
| Add the Genymotion plugin to Android Studio |
Emulator Device
This may be what the developers are looking for, how to use our mobile devices for direct simulations. Why do we use cellphones to build Android applications? The answer is that our laptop is lighter when we are coding Android. Our laptop RAM is more efficient because it is not used for Android emulators which is quite tiring and sometimes upsetting.
The necessary preparation is to provide:
》 Android mobile.
》 USB cable connecting the handphone to the laptop.
Make sure the handphone driver is installed on the computer. How to install it is very easy, just connect the handphone to the laptop. Usually drivers for mobile phones are available / default from the cellphone itself or through internet downloads.
For example if we have saved in the My Computer directory,
 |
| Mobile Driver |
After the driver is ready to be installed, please check the Device Manager.
 |
| Device Manager |
 |
| Check Device Manager |
Next, activate the development mode and USB debugging on the handphone. The trick, open Settings > More > Developer option (for this location depends on the mobile phone used).
 |
| Enable Developer options and USB debugging |
 |
| Run the application |
Next, open Android Studio and do the run project that was created (create an Android Studio project).
 |
| Choosing application development targets |
From the picture above can be seen Android devices (cellphones) that we will use to run Android applications.
To more easily manage Android devices on the desktop, we can install the Vysor application on laptops and Androids. For the Vysor application is as an Android remote on the desktop.
 |
| Vysor Android Application |
Read: https://knowledgefrans.blogspot.com/2020/02/project-structure-android-studio.html?m=1
Sunday, February 9, 2020
Installing Android Studio
After JDK is installed, the next step is to install Android Studio. Following the installation process.
Read: https://knowledgefrans.blogspot.com/2020/02/emulator-android-studio.html?m=1
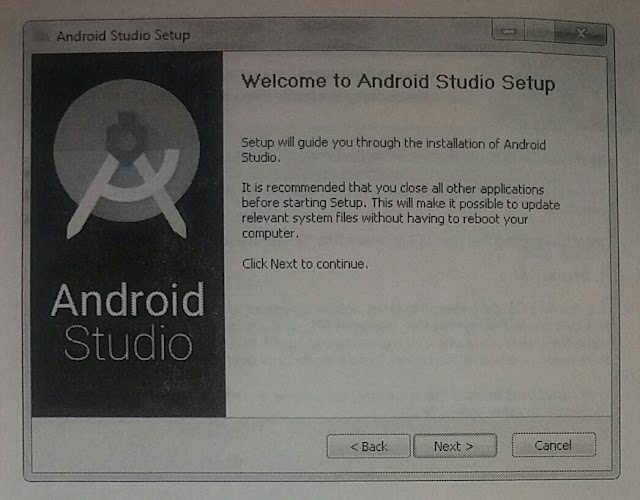 |
| The initial step of installing Android Studio |
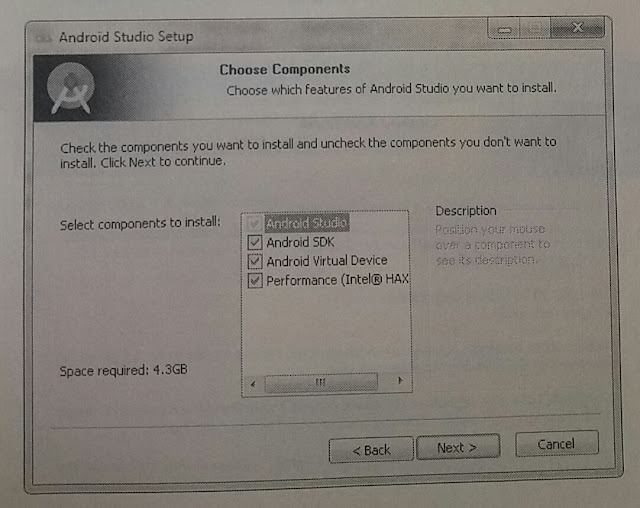 |
| Selection of Package to be installed |
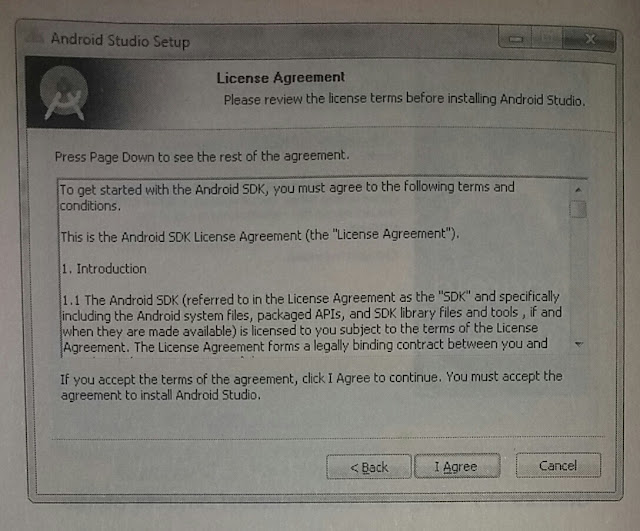 |
| Android SDK License Agreement |
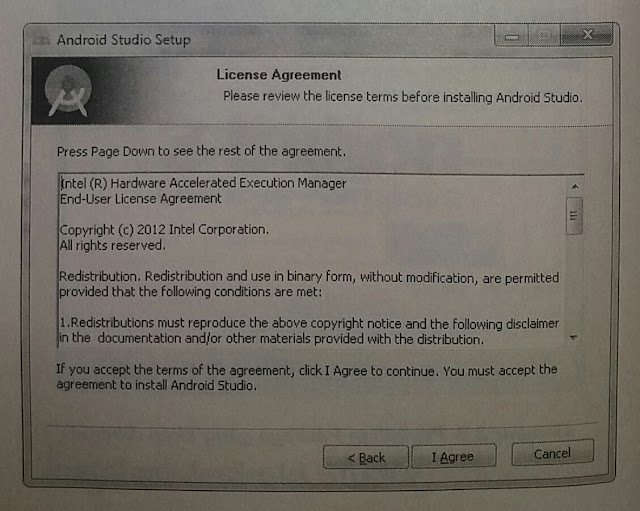 |
| License Agreement |
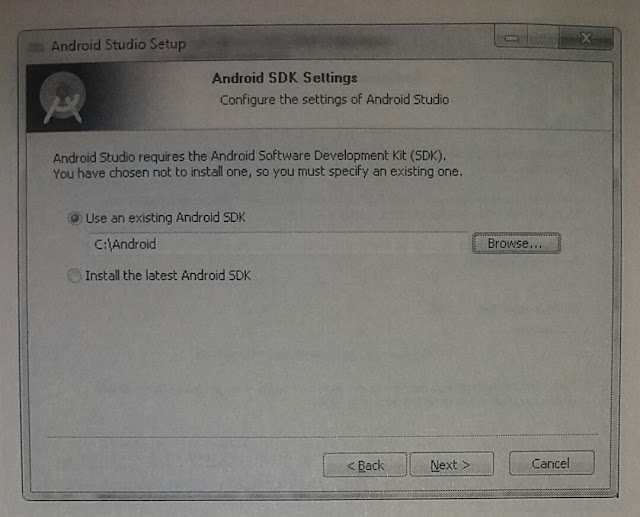 |
| Android SDK Path Selection |
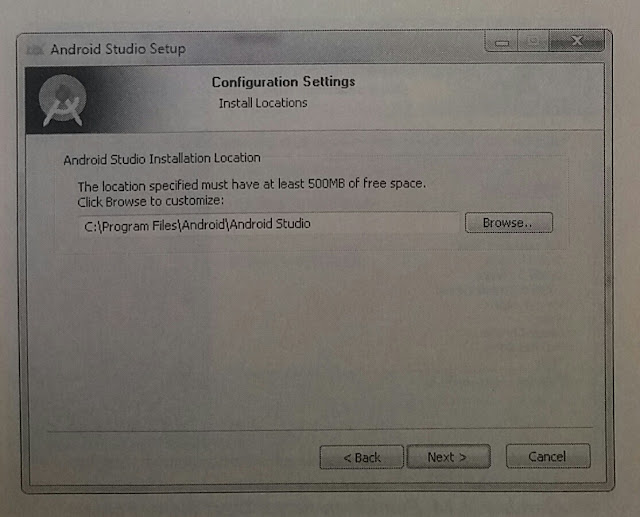 |
| Selection of installation location |
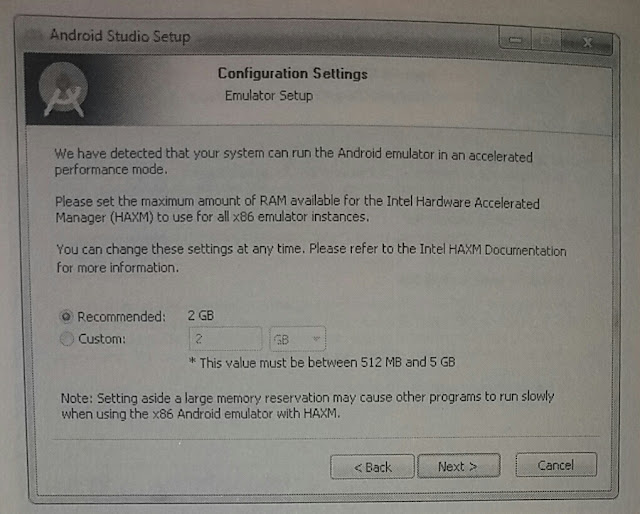 |
| Configure memory allocation |
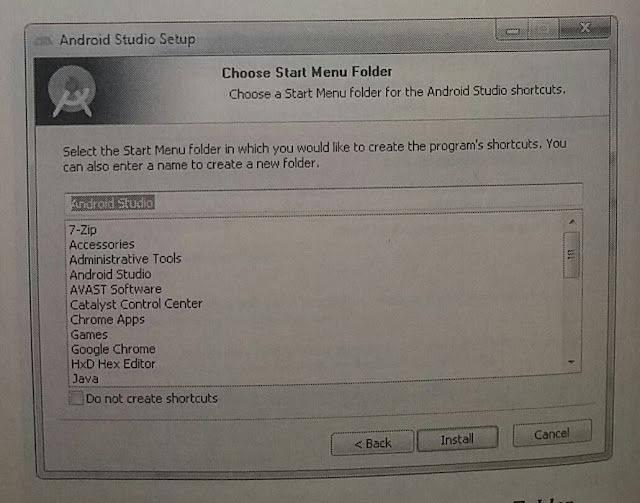 |
| Select the Start Menu Folder name |
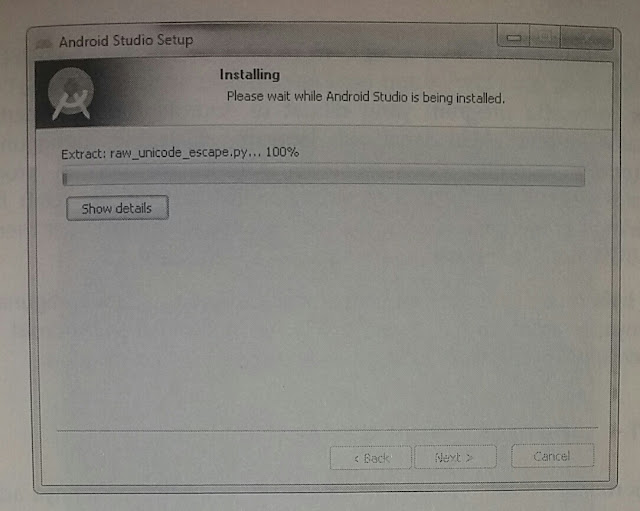 |
| Installing Android Studio |
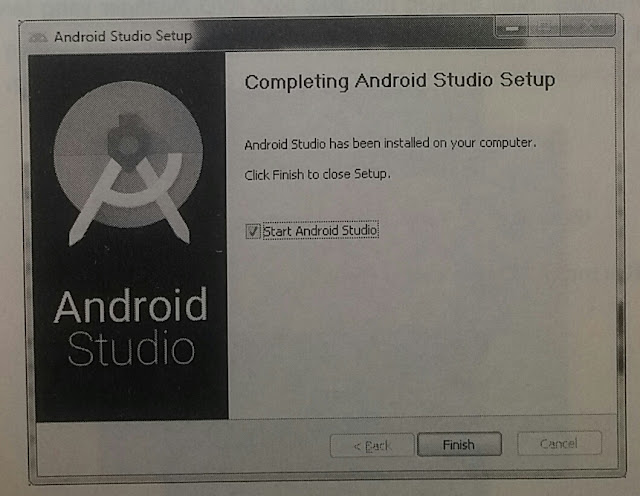 |
| Android Studio installation process is complete |
Read: https://knowledgefrans.blogspot.com/2020/02/emulator-android-studio.html?m=1
Java Development Kit (JDK) - Android Studio
One of the requirements of Android Studio is JDK or Java Development Kit. Therefore, the first step that must be done before installing Android Studio is to install JDK. JDK can be downloaded at http://www.oracle.com/technetwork/java/javase/downloads/jdk8-downloads-2133151.html.
The following are the steps for installing the JDK jdk-8u65-windows-x64.
Read: https://knowledgefrans.blogspot.com/2020/02/installing-android-studio.html?m=0
The following are the steps for installing the JDK jdk-8u65-windows-x64.
 |
| JDK installation |
 |
| Package Selection |
 |
| The process is waiting for installation |
 |
| Selection of installation location |
 |
| The installation process takes place |
Read: https://knowledgefrans.blogspot.com/2020/02/installing-android-studio.html?m=0
Subscribe to:
Comments (Atom)
ENGLISH PHRASES
YOUTUBE ENGLISH PHRASES no one said it was to be going easy. tidak ada yang mengatakan itu akan berjalan mudah. that wasn't the re...
-
There are various kinds of widgets provided by Android. Some of them are as follows: TextView TextView is used to display text to the user...
-
Hidupku adalah milik Tuhan dan aku hidup hanya untuk Tuhan. Nama: Francesca N Akun Sosmed: Facebook : ( https://m.facebook.com/nia.este...
-
Building an Android Application is very easy, the programming language used by Android is java. Not all java features are used, but only a p...


